Learn how to make your own butterfly painted rocks in this easy step by step tutorial. Inspired by real life butterflies, this rock painting craft is great for both kids and adults!
Rock painting is such a fun activity. Great for an outdoor craft during the warm months or a fun indoor activity during the winter months.

This Post May Contain Affiliate Links. Please Read Our Disclosure Policy.
Perfect for beginners or professionals. Kids love rock painting crafts and butterflies are an easy design for them to try.
Only a few materials are needed to create this beautiful butterfly craft. Great as gifts, garden art, kindness rocks, or even learning tools.
For more rock painting inspiration make sure to check out: Ladybug Painted Rocks, Rock Painted Insects, and Rainbow Rocks
Jump to:
Supplies
- Rocks: either purchased online or collected outside. I love using smooth river rocks, but really any type of rock will work!
- Acrylic Paint: acrylic paint works well for this project since it bonds to surfaces including rocks. Plus you can mix and match to create your own unique colors.
- Paint Tray: keeps colors separate and allows room for mixing colors. I personally like the small circular trays.
- Small Paint Brushes: great for adding details and painting the body of the insect. I found that this brush set does not shed while painting.
- Protective Sealer: sealing your rocks with a gloss topcoat will keep them protected from the weather. Plus the glossy coat has a nice shine.
- Piece of Cardboard: used when sealing your rocks. Also great as a work surface when painting.
- Q-Tips: optional, but you can use them to paint spots
- Toothpicks: also optional, but work great for small details
- Jar with Water and Rags: for washing and drying brushes and spills
- Blow Dryer: optional, but helps speed up the drying process
Preparing the Rocks
Before you begin painting your butterflies, you will want to wash and dry the rocks. This removes any dirt and debris.
Rocks can be found online through places like Amazon. Or you can head outside and collect a few rocks.
I love bringing home a few river stones whenever we visit a local lake, river, or even the beach. These smooth rocks are great for rock painting crafts.

However, even rocks you find outside can work just fine. The ones that I used for this DIY craft were collected out in our yard.
I think the imperfections add to the character of each butterfly.
If doing this project with your kids, let them head outside and pick out some rocks. I love how creative kids are when given the opportunity to make something out of everyday items including rocks!
Planning out the Butterfly Designs
The best thing about this diy craft project is that you get to be creative. Prior to painting my butterflies I looked through books and even this butterfly puzzle for ideas.
In the end I decided to base my painted rocks off of real life butterflies. Of course, that part is optional.
Remember crafting is fun and even butterflies that you make up with your own imagination will be beautiful!

Monarch's, Swallow Tails, Pavions, or even moths would be fun to paint for this project.
If combining this project with a butterfly unit study, you can have your kids paint the butterflies to resemble ones that they are studying.
Painting the Rocks
Once you decided on your designs, it is time for the fun part...the painting!
First, use a paint brush to paint the outline of your butterfly. Then fill in the outline using the same color.
This is the color that is found on most of your butterfly.
For me, this was yellow for the Swallowtail, orange for the Monarch, and purple for the Pavion.

For the free butterfly templates shown in the image above check out: Cute Butterfly Printables and Insect Printables for Kids
Let the paint dry. A blowdryer or the hot sun will speed up the process.
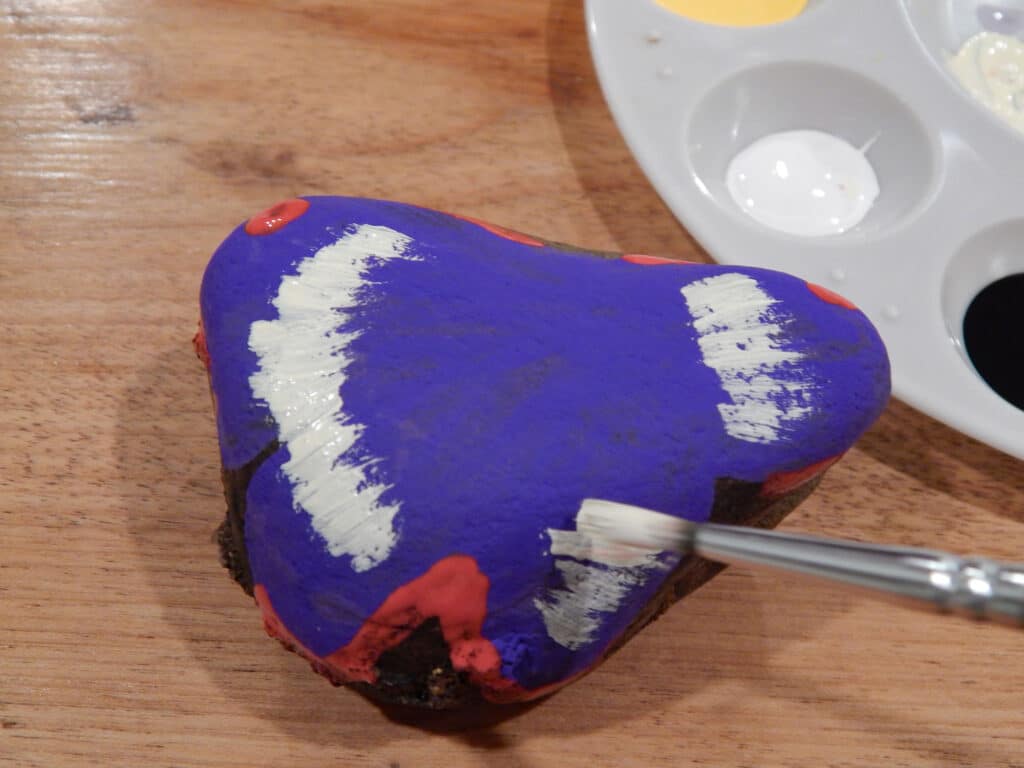
Before adding too many details, it find it helpful to paint the center of the butterfly's body along with large bands or stripes on the wings.

Next, go in with a small paint brush or toothpick and add in details. These include designs on the wings including spots, patterns, and markings of different colors.

Often times, these details are different colors, like the ones that make up a Pavion butterfly.
Just use a different toothpick or clean your paint brush in between uses to add all of the different colors.

Last is to go in and add the antennae. The fascinating thing about butterflies is that different species will have different shaped antenna.
Some will be very long and thin while others are short and feathery.
If painting your rocks to look like butterflies you find in real life, now is a great time to do some research to learn about the shape of the antenna.
You may be surprised to find out how different each species of butterfly is compared to one another!

If needed, go back and add more details until you are happy with your design,
Then, let the paint dry for at least 12 hours before applying a clear protective coating.
Sealing the Rocks
After letting the paint dry for 12 hours it is time to seal the rocks. Applying a top coat will allow you to keep your painted rocks outside in the yard or garden.
Without the protective layer, overtime the paint can start to come off. Plus the glossy coat makes the butterfly designs really pop!

Look for a sealer that is designed for masonary or stone and is designed for outdoor use.
Krylon and Rust-oleum are great products that you spray on the rocks. They both come in a gloss finish. For this project I used the Kyrlon.
Tips for Sealing Painted Rocks
It is best to always seal your rocks outdoors or in a well ventilated area. Before spaying, read the directions on the spray can.
Place the rocks upside down on a piece of cardboard, preferably outdoors.
Apply 2-3 coats of sealer to the bottom side of the rocks. Allowing time to dry in between coats.

Once completely dry, flip over the rocks. Make sure they are dry before you move on to this step as you do not want them sticking to the cardboard.
Then apply 2-3 coats to the top and sides of the rocks.
When spraying, keep the can about arms length from the rocks. You do not want to apply one thick coat, but rather a few thin coats of sealer.
Wait for the clear coat to dry completely before handling the rocks. Then you are done, it really is a super fun and easy project!
How to Use Painted Rocks
There are so many uses for these finished butterfly rocks. You can give them away as gifts or use them as decorations.
A personal favorite is to place them around the garden. I love spotting a colorful butterfly when I'm walking around enjoying the plants.

You can also keep them indoors. Painted rocks make great paper weights or decorations at your desk. A sure way to cheer up a dreary day!
If making these with kids, they can use them as learning manipulatives. My son, has claimed several of my painted rocks as his own.
Children of all ages can use them for pretend play or as prompts to go along with a story about butterflies.
They also make wonderful hands-on manipulatives for young children who are learning basic math skills including counting 1-10.
More Butterfly Crafts and Resources
Enjoyed this post? Make sure to leave a review, then check out our other butterfly resources:
Butterfly Painted Rocks

Butterfly painted rocks is an easy rock painting project for both kids and adults. Learn how to paint your own butterfly designs in this step by step tutorial.
Materials
- Rocks
- Acrylic Paint
- Gloss Spray Sealer
- Painting Tray
- Piece of Cardboard
- Jar with Water
- Rag
Tools
- Small Paint Brushes
- Q-Tips
- Toothpicks
- Optional: Blow Dryer
Instructions
- Wash and dry rocks
- Using a small paint brush, paint the main outline of the butterfly wings using one color.
- Let dry.
- Add the body of the butterfly using a small paint brush.
- Next, add details including lines, dots, and any patterns on the wings using a paint brush, q-tip, and toothpick.
- Paint the antennae.
- Let dry for at least 12 hours.
- Lay rocks bottom side up outside on a piece of cardboard.
- Spray 2-3 coats of clear protective sealer on the bottom side. Allow time to dry in between coats per the directions on the spray can.
- Once completely dry, flip over the rocks and apply 2-3 coats of clear coat to the top and sides of the rocks. See specific directions on spray sealer.
- Wait to dry completely before handling.
Notes
1. Acrylic paint can stain clothes and surfaces. Clean up spills with a a wet rag before the paint dries.
2. A blow dyer can help speed up the dry time of the paint. Another option is to place rocks in the sun to dry.
3. Always follow specific directions on the can of spray sealer for specific dry times. It is recommended to spray rocks outside.
4. Kids love creating painted rocks, adult supervision is required for all of the steps of this craft project.


Comments
No Comments