Is there anything better than picking apples during the fall season? Painting with apples is fun way to use some of those apples in a creative way.
Read on to learn how to paint using apples for a classic autumn craft for kids!
If you are homeschooling, apple activities are a great way to incorporate science, math, art, and language arts. Kids love when learning happens along side everyday events.
What Ages will Benefit from this Activity
- Toddlers
- Preschoolers
- Kindergartners
- Elementary

This Post May Contain Affiliate Links. Please Read Our Disclosure Policy.
Jump to:
Apple stamping is traditionally thought of as a toddler, preschool or kindergarten craft, but really kids of all ages will enjoy this activity.
Creating unique pieces of art is a great form of self expression for kids.
The goal of painting with apples is not to create a perfect apple painting, but to enjoy the process of creating.
Sometimes we get caught up in trying to create a perfect piece of art and forget that making art is all about the process.

Kids of all ages can benefit from process art, that is art that is all about the act of creating and less about the final product.
To read more about process art, check out this informative article. Basically, allow kids to have fun while creating a unique art piece.
Apple Painting Supplies
- Real Apples
- Red and Green Acrylic Paint
- Paper plate or Disposable Pallet
- Cardstock or Blank Paper Pad
- Knife with cutting board
- Paper towels or rag
- Flat Surface
- Optional: Apron and table cloth
For this craft project, your kids will use different parts of an apple instead of a traditional paint brush to apply paint.
I love painting with apples because as long as you have paint and paper on hand, all you need is one or two apples.

Depending on the surface you use, a table cloth or drop cloth can protect it from paint. I used my kitchen table and made sure to clean up any paint splatters before they dried.
I'm pretty laid back when it comes to paint getting on surfaces, however acrylic paint can be hard to get out of clothes, fabric, and furniture.
Cardboard, cardstock, or paper from a paper pad can all be used for apple stamping.
Kids love it when they can create large pieces of art. It would be fun to save a large cardboard box and use it for this project.
Making Stamps from Apples
Now for the fun part, deciding what parts of the apple to use! I am not one to waste food, so I used left over pieces from an apple exploration.
The remaining apple slices can be eaten for a healthy snack.
However, up here in New England, many neighbors are more than willing to give away extra apples growing on trees in their yards if you ask.
Most people have more apples than they know what to do with!
If you go apple picking or are cooking with apples, simply put aside a few extra pieces for this activity. Apple cores, apple slices, or even half of an apple make great stamps for apple painting.
You really don't need that many apples to do this activity, even with several children.
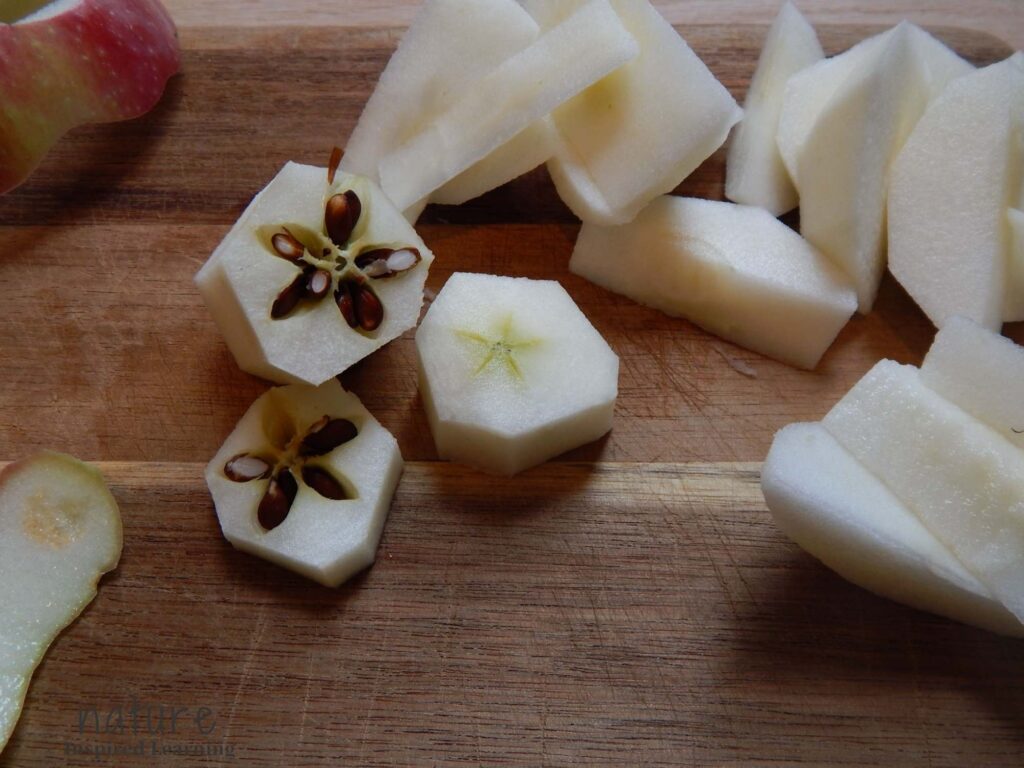
The core, or the center makes a great star stamp for kids. To create a star pattern, simply cut the core in half.
This leaves you with two easy to hold star shaped stamps. If you happen to get an apple with leaves still attached, kids can paint with those too.
Apple wedges about one inch thick are also fun for kids to paint with. Just make sure to leave enough apple for them to grasp.
If you are doing this project with young children, you will notice them problem solving as they try to pick up and move around the apple slice.
I love when a craft project causes kids to use critical thinking and logic skills!

Cutting the apple directly in half is also a great option for stamping. However, I noticed that paint can collect in the core and cause it to unevenly distribute over the apple.
However, the more options you give your kids the better.
They may even ask you to cut them a different way after they begin painting. If they need help grasping the apple a fork, craft stick or even cutting into the apple to make a handle is helpful.
How to Set up the Apple Painting Supplies
- Gather supplies
- Optional: put on an apron and or set out a tablecloth
- Cut apples into different pieces. Kids love to watch and observe this part of the process. Let them check out the seeds, star shaped core, and flesh of the apple.
- Pour paints (red and green) onto a paint tray, paper plate, or disposable pallet.
- Lay out the paper and apple pieces.
- Step back and let your kids start creating.
- Listen as your child describes what they made.
- Place paper in a place to dry and clean up.

Sometimes as a parent we are eager to jump in and show them what to do, but often times the best learning happens through experimentation.
My son was really into stamping the apple slices and not really into the star shaped stamps. That is okay! Let your child guide the process.
Once they are done, you might be surprised to hear their interpretation of their art work. Many times, young children will create a whole story and none of it will include apples!
Extend the Activity
Reading a few good books about apples is a great way to extend this craft project. Simple apple tree coloring pages are great for little ones.
Or if you are up for a fun science experiment, this apple science experiment is a great, even for preschoolers.
Jill McDonald's board book, How Do Apples Grow is one of my favorite children's books about apples.
Filled with facts, scientific diagrams, and colorful illustrations, this board book is a great resource for learning about the life cycle of an apple tree.
If you are looking for a children's story book about apples, How to Grow an Apple Pie is a great pick. Follow along with the main character she waits unit her apple tree is mature enough to produce apples.
Another great story about the life cycle of an apple tree. You can find all of apple book requirements in this apple book post.
Have you ever created a painting using apples? Let us know in the comments below!
Painting with Apples

Materials
- Fresh Apples 1 per child
- Cardstock or Thick Paper
- Red Acrylic Paint
- Green Acrylic Paint
- Pallet or Paper Plate
- Paper Towels or Rags
- Cutting Board
- Work Surface
- Apron
- Tablecloth or Dropcloth
Tools
- Knife
Instructions
1. Gather supplies
2. Optional: put on an apron and or set out a tablecloth
3. Cut apples into different pieces. Kids love to watch and observe this part of the process. Let them check out the seeds, star shaped core, and flesh of the apple.
4. Pour paints (red and green) onto a paint tray, paper plate, or pallet.
5. Lay out the paper and apple pieces.
6. Step back and let your kids start dipping the apple pieces into the paint then onto the paper.
7. Listen as your child describes what they made.
8. Place paper in a place to dry and clean up.
Notes
Apples can be cut into slices, star patterns, or cut in half to make apple shaped stamps. Allow your child to create their own unique art piece using the apples.
Acrylic paint can stain fabric and furniture, make sure to clean up when still wet or cover surfaces in advance to protect them. Always use child safe paint that is non toxic. An AP Certification stamp from the Art & Creative Materials Institute means the paint meets their standards.
Allow paintings to dry for at least one hour. And of course, never eat apples once they have been used for this painting project.


Janet
Love all the great ideas. I plan on using them with my 3 granddaughters. They will learn so much and enjoy every minute. Thank you so much!